Single-Cycle Cleaning Protocol for Screw Cleaning Furnaces
Most operators think cleaning a screw barrel is just load, heat, wait, unload. That works until it does not work. Then you get carbon streaks, discolored bores, or barrels that pass visual inspection but fail in the first hour of production. The difference between a clean barrel that runs perfectly and one that causes headaches comes down to following a proper single-cycle protocol every single time. No shortcuts. No skipping steps. No guessing.
Pre-Load Checks That Take Two Minutes But Save Two Hours
Before you even touch the door, there are things you need to verify. Skipping these is the fastest way to ruin a batch.
Inspect the Barrel Before It Goes In
Look at the screw surface under good light. Note where the heaviest buildup is. If carbon has caked into the flight roots or the mixing section, mark it mentally because that area needs the longest dwell time. A barrel with light surface carbon and one with deep flight carbon should not run the same profile. If you treat them the same, one will be over-cleaned and the other under-cleaned.
Check for any visible cracks or damage in the bore. A compromised barrel under vacuum and high heat can fail mid-cycle, and that is not just a cleaning problem. It is a safety problem.
Verify Chamber Conditions Before Loading
Open the door and look inside. The chamber floor should be free of residue from the last run. Any leftover carbon acts as a contamination source for the next load. Wipe it down with a lint-free cloth. Check the door gasket for cracks or compression set. A bad gasket means vacuum loss, which means incomplete cleaning. Check the quartz or ceramic supports for chips. A cracked support will shift under load and block gas flow to the barrel surface.
These checks take two minutes. They prevent two hours of troubleshooting later.
Loading the Barrel the Right Way
How you place the barrel inside the chamber matters more than most people realize.
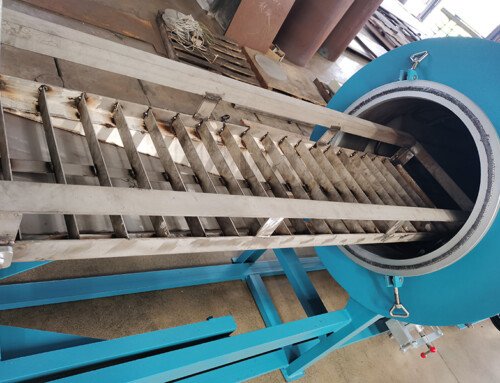
Elevate the Barrel Off the Chamber Floor
Never let the barrel sit directly on the chamber floor. The bottom surface needs exposure to vacuum and heat just like every other surface. Use ceramic or quartz supports that hold the barrel at least 3 centimeters off the floor. This allows gas to flow underneath and around the entire barrel, including the feed throat and the discharge end.
If you are cleaning a long barrel, use two supports, one near each end. A single support in the middle lets the ends sag, which creates shadow zones where residue will not burn off.
Orient the Flighted Section Toward the Heat Source
Most screw barrels have a flighted section and a smooth bore section. The flighted section traps the most residue. Position the barrel so the flighted area faces the primary heating zone. In a vertical furnace, this means loading the barrel upright with the flights facing inward toward the heating elements. In a horizontal furnace, lay it on its side with the flights facing up. This is not about perfection. It is about giving the dirtiest part of the barrel the most direct heat exposure.
Setting Up the Single-Cycle Program
A single-cycle program is not just one temperature and one time. It is a sequence with stages, each doing a specific job.
Stage One: Low-Temperature Bake-Off
Start at 200 to 250 degrees Celsius for 20 to 30 minutes. This stage drives off moisture and light volatiles without spiking chamber pressure. If you skip this and go straight to 400 degrees, the rapid outgassing can overwhelm the vacuum pump and cause pressure spikes that abort the cycle or leave residue behind.
The ramp rate here should be slow. Aim for 5 degrees Celsius per minute. Fast ramps at low temperature create thermal stress on the barrel surface, especially on barrels that have been sitting cold in storage.
Stage Two: Primary Cleaning at Mid-Temperature
Ramp to 350 to 380 degrees Celsius at 3 to 5 degrees per minute. Hold for 45 to 60 minutes. This is where the bulk of the carbon and polymer residue breaks down. The vacuum should be at target level before you start this stage. If vacuum is still climbing, you are wasting time and energy.
For barrels with heavy carbon, extend this hold to 75 minutes. For light residue, 30 minutes is enough. The key is to match the dwell time to the actual buildup, not to a guess.
Stage Three: High-Temperature Burn-Off for Stubborn Residue
If the barrel had PVC, POM, or heavily cross-linked polymer residue, push to 420 to 450 degrees Celsius for 20 to 30 minutes. This stage cracks and volatilizes the stuff that the mid-temperature stage could not touch. Do not run this stage on every barrel. Only use it when you know the residue requires it. Running high temperature on a barrel that only had PE residue will not clean it better. It will just waste energy and stress the barrel surface.
What to Do During the Cycle
Once the cycle starts, your job is to monitor, not interfere.
Watch the Vacuum Gauge for the First 30 Minutes
The first half hour is where most failures happen. If vacuum is not dropping as expected, check for leaks. If it drops too fast and then climbs back up, you have an outgassing problem, which means the ramp is too aggressive. Slow it down. If the vacuum holds steady, you are good. Walk away and let the machine do its work.
Do Not Open the Door for Any Reason
I know it is tempting. You want to check if it is working. It is working. The temperature sensors and vacuum gauges are telling you everything you need to know. Opening the door mid-cycle introduces cold air, spikes pressure, ruins the temperature profile, and can crack the barrel. If the alarm goes off, let the system complete its shutdown sequence. Then investigate.
Post-Cycle Handling That Protects Your Clean Barrel
The cleaning is done. But the job is not. How you handle the barrel in the next 30 minutes determines whether it stays clean.
Cool Down Inside the Chamber First
Let the furnace cool the barrel down to below 200 degrees Celsius with the door closed. This takes about 30 to 45 minutes depending on the chamber size. Do not open the door early. Do not blast it with compressed air. The slow cool-down prevents thermal shock and keeps the clean surface from re-oxidizing.
Handle With Clean Gloves Only
When you pull the barrel out, wear lint-free nitrile gloves. Skin oil transfers to the bore surface and creates a contamination layer that will show up as black specks in your first production run. If the barrel is still warm, the oil bonds to the metal even faster. Wait until it is below 50 degrees Celsius before handling, or use gloves every time without exception.
Store in a Clean, Dry Environment
A clean barrel sitting in a dusty corner for three days is not clean anymore. Store it in a sealed bag or a clean cabinet. If you are not running it within 24 hours, wrap the bore ends with clean tape to keep dust out. This sounds like overkill until you get a batch of good parts that mysteriously have surface defects. Nine times out of ten, it was post-cleaning contamination, not a cleaning problem.