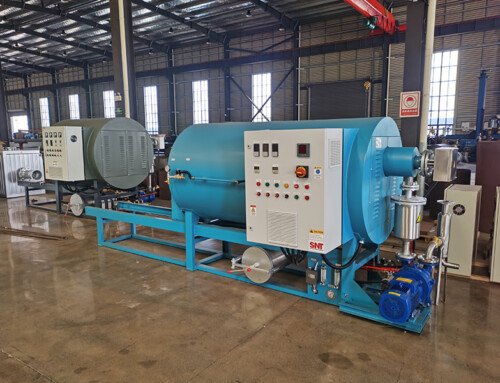
Different screw materials respond very differently to heat, friction and chemical exposure during the cleaning process, and using a one-size-fits-all method will easily scratch precision surfaces, warp threads or strip away protective coatings. Even small missteps during operation can ruin the tight manufacturing tolerances that these parts rely on, leading to inconsistent performance in daily production. Matching your operating steps exactly to the material of the screw you are working with will help you get a full, thorough clean every time, while keeping every component in perfect working condition for years of use.
Standard Alloy Steel Screw Operation Tips
For most general purpose screws built with heat treated low alloy steel, start by setting the initial heating ramp at a slow, steady pace instead of jumping straight to maximum operating temperature. Let every section of the screw heat up evenly across its full length, so no single spot expands faster than the rest and creates tiny internal stress points that can lead to bending later. Keep the screw rotating at a low, consistent speed through the entire heating phase, so any softened residual material spreads evenly across the thread surfaces instead of sticking in thick, concentrated layers.
When you reach the target cleaning temperature, maintain a gentle, uniform level of friction across all contact points. Avoid applying sudden high pressure to push stubborn residue off, as this can leave fine scratch marks on the precision ground surface that will trap more leftover material in future production runs. Once the cleaning cycle finishes, let the entire system cool down slowly with the screw still turning at low speed, instead of blasting cool air directly onto the hot metal to speed up the process. This gradual cooling prevents thermal shock that can make the steel lose its original hardness and wear down much faster during regular use.
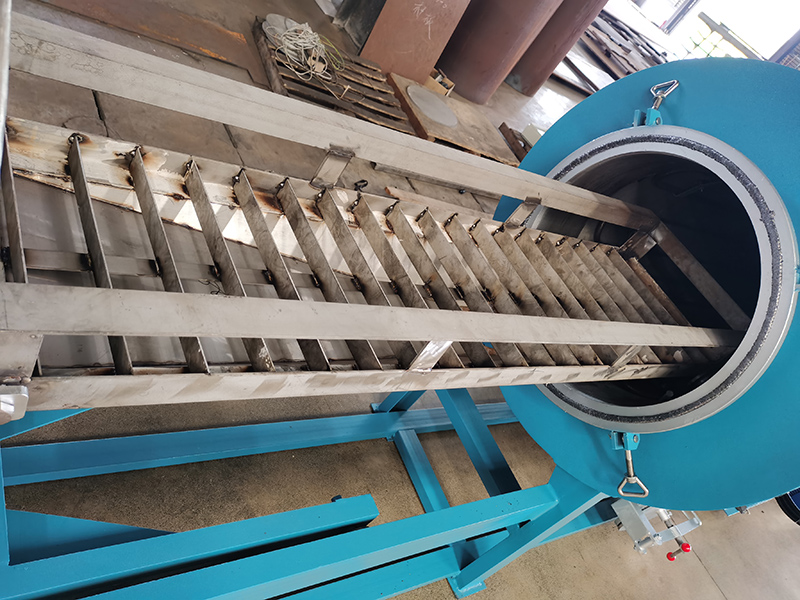
After the cycle completes, do a quick visual check along the full length of the screw. Wipe down every thread land with a soft, lint free cloth while the part is still slightly warm, to remove any faint leftover film that did not fully break down during cleaning. This small extra step stops thin residual layers from hardening into a thin, carbonized coating over time, and keeps the smooth surface finish that these screws rely on for consistent material flow.
Surface Coated Screw Handling Rules
Screws with specialized wear resistant or corrosion resistant coatings need far more careful handling, as their thin surface layers can chip, peel or scratch very easily if exposed to rough treatment. Never use high friction, abrasive cleaning methods on these parts, even when you are working to remove thick, heavily carbonized residue. The hard abrasive particles will strip away tiny pieces of the coating, creating weak spots that expand quickly during regular production and ruin the screw’s performance.
Control the maximum cleaning temperature to stay well below the coating’s rated heat limit, and avoid holding the part at peak temperature for longer than the required cycle time. Extended exposure to excessive heat can make the coating separate from the base metal underneath, creating tiny gaps where residual material can get trapped and cause hidden contamination in future production runs. Keep screw rotation speed at the lower end of your standard operating range through the entire process, to prevent any accidental contact between the screw edge and the inner chamber wall that can chip the delicate coating.
Once the cleaning cycle finishes, inspect every critical contact point along the screw, especially the flight tips and mixing sections that see the most wear during production. If you spot any faint discoloration that does not wipe away easily, do not scrape at it with a hard metal tool. Run a second, shorter low temperature cycle instead, to gently break down the leftover material without putting any unnecessary force on the coated surface. This careful approach will keep the coating fully intact, and preserve the screw’s original wear resistance for thousands of operating hours.
High Performance Specialty Screw Best Practices
For screws built from high strength stainless steel, or other specialty alloys designed for extreme production environments, pay extra attention to even heat distribution across every single section of the part. These materials have very low tolerance for uneven localized heating, and even a small hot spot can create permanent warping that throws off the part’s tight alignment tolerances. Make sure no single heating zone runs more than a few degrees higher than the rest of the system, and never point any concentrated heat source directly at one small spot on the screw surface.
Avoid exposing these specialty materials to harsh chemical agents that are not formulated for their exact alloy composition. Even mild chemical exposure that would not affect standard steel can cause faint surface etching on these precision parts, creating tiny pits that trap residual material and make future cleaning far more difficult. Keep all chemical exposure times short and strictly controlled, and rinse every surface completely with neutral, mild solution immediately after the chemical treatment step finishes.
At the end of the full cleaning process, let the screw sit in a dry, temperature controlled area for a few minutes before you move it back to storage or reinstall it in production. This lets the part equalize to room temperature slowly, so no unexpected condensation forms on the metal surface that can cause faint rust spots or surface discoloration over time. A thin, even wipe of protective anti seize compound on the mounting ends will keep the part ready for quick, smooth reinstallation, and prevent unexpected sticking between the screw and drive shaft during future production runs.